Posts

Audience And Agenda

Audience And Agenda

The below series of posts is useful for, Developers. Infra Specialists. Dev/Sys Specialists. towards, Hands-on with underlying code and configuration. Jump start implementations of Continuous Integration/Quality/Testing/Delivery/Deployment/Everything. Jump start delivery pipelines. It is NOT, Focussed on any DEVOPS tool/technology. Focussed on any particular method/concept. Talking about advanced usage. Some Pre-requisites before you jump in, Basic shell scripting. Basic java/java script programming. The first series of posts are about continuous integration in its simplest form, Let's get started. Next-->

Continuously Integrate On Every Commit

Image
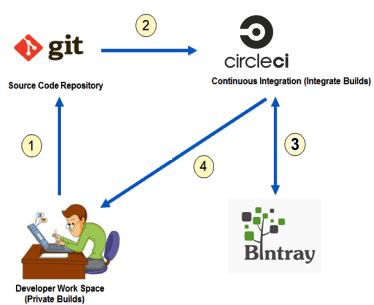
Continuously Integrate Every Commit. Continous Integration With Circle CI This is the software development cycle we are going to work hands on, 1. The developer Commits to source code repository 2. Continous Integration Server (Circle CI) triggers a build. 3. After the build is successful, it pushes to Artifact Manager, In our case BinTray. 4. Success or failure, the developer is notified. <--Previous Next-->

Step-1: Checkout And Run Code

Image
Step 1: Checkout And Run Code Locally. Check Out Source Code And  Run Locally Please follow the steps, 1. Please check out the source code using git client or github desktop. 2. Run ./gradlew clean build. 4. Check out the build files created. Just make a note, how those get generated on compilation, is immaterial based on what we are trying to do. 4. Publish locally, to see what files are generated. Before running the publish, After running the publish  ./gradlew --info clean publishToMavenLocal , References: https://medium.com/@rfletcher_96265/an-automated-release-workflow-using-gradle-nebula-bintray-circleci-694e65184348 <--Previous Next-->

Step-2-a: Publishing Artifact To Local

Image
Step-2-a: Publishing To Local We are going to publish locally, ensure it is working before publishing to bin tray. Publish To Local .m2 Steps To Follow To Publish Locally: 1. Clear the repo "io" directory. 2. Switch the branch. 3. Publish locally. 4. Check the published jars. <--Previous Next-->

Step-2-b: Tag Github And Publish To Local

Image
Step-2-b: Tag Github And Publish To Local 1. Just delete generated repo artifacts in local. Maheshs-MBP-2:repository maheshrajannan$ pwd /Users/maheshrajannan/.m2/repository Maheshs-MBP-2:repository maheshrajannan$ rm -fr io 2. Set release version and publish Maheshs-MBP-2:gradle-release-demo maheshrajannan$ pwd /Users/maheshrajannan/git/gradle-release-demo Maheshs-MBP-2:gradle-release-demo maheshrajannan$ ./gradlew -Prelease.version=0.8.0 publishToMavenLocal 3.Observe the version numbers change. 4. Just observe the tags in github. 5. What just happened here ? The gradle plugins we applied tagged the Github repo and then published the artifact to maven local. The artifact is named as v0.8.0 and the corresponding source code is tagged. 6. You can create an other tag by " ./gradlew -info final publishToMavenLocal "  7. Check the local jars. <--Previous Next-->

Step-3: Publish To Bin Tray

Image
Step-3: Publish To Bin Tray Publish From Local To BinTray Steps To Follow 1. Now change the git branch to 3-publish. 2. Sign up for  bintray . 3. Create Repo-artifactory and organization in bin tray. 4. Generate the keys in bintray for publishing. Enter password, click submit, keys will be generated and store it safe. 5. Set the keys as environment variables in your local. export BINTRAY_USER=maheshrajannan export BINTRAY_KEY= 6. Get,set, publish. ./gradlew -Prelease.useLastTag=true final 7. Check it in bin tray. 8. Do publish to local and see the version. ./gradlew -Prelease.useLastTag=true publishToMavenLocal 9. Now just do final to see the version numbers increment in github and bintray. ./gradlew final <--Previous Next-->

Step-4: Continuously Integrate

Image
Step-4: Continuously Integrate With Circle CI Continuously Integrate With Circle CI Steps : 1. Create account in circle ci. 2. Change the default branch in github repo to "4-automate. 3. Switch branch to 4-automate. 4. Scan this particular repo in Circle CI. 5. Create a Circle CI job, to trigger on commit. 6. Configure bin tray keys in circle ci environment. 7. Make a change and push and see the build automatically trigger. 8. Create a release tag in github. Circle CI will use the release in github and publish new release artifact to bintray. <--Previous First-->